Configure Static IP from the ZT231 or ZT411 Printer Screen
Before starting, get these values from your network administrator:
- IP Address (Example : 192.168.1.50)
- Subnet Mask (Example : 255.255.255.0)
- Gateway (Example : 192.168.1.1)
These are examples only. Make sure the IP you choose is not already being used by another device.
Step 1 - Open the Connection Menu
On the printer touchscreen:
Home → Menu → Connection → Wired
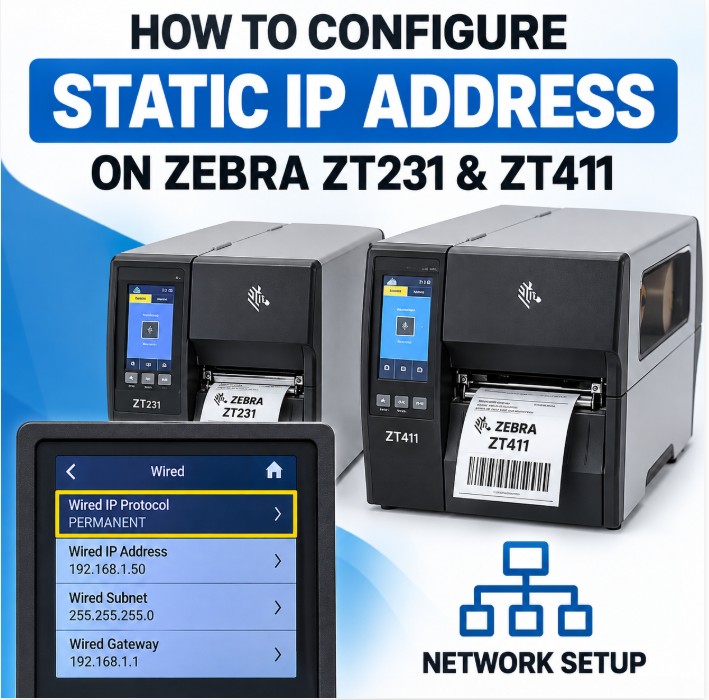
You should see settings including:
- Wired IP Protocol
- Wired IP Address
- Wired Subnet
- Wired Gateway
- Wired MAC Address
Zebra lists these exact settings for both the ZT231 and ZT411.
Step 2 - Set Wired IP Protocol to PERMANENT
Select:
Connection → Wired → Wired IP Protocol
Change it from:
ALL
to:
PERMANENT
This is the most important step.
PERMANENT tells the printer that you are manually assigning the IP address, rather than allowing DHCP or another network service to assign it.
Step 3 - Enter the IP Address
Go to:
Connection → Wired → Wired IP Address
Enter your desired IP address.
For example:
192.168.1.50
The printer accepts values from 000 to 255 for each section.
So:
192.168.1.50
is entered as:
192 → 168 → 1 → 50
Save/confirm the value.
Step 4 - Enter the Subnet Mask
Go to:
Connection → Wired → Wired Subnet
For a typical network, enter:
255.255.255.0
Again, use the subnet mask supplied by your network administrator rather than automatically assuming this value.
Zebra specifically identifies Wired Subnet as one of the settings that must be configured when using a permanent IP.
Step 5 - Enter the Gateway
Go to:
Connection → Wired → Wired Gateway
For example:
192.168.1.1
The gateway normally corresponds to your router/network gateway.
Zebra notes that the gateway should match the gateway used by your LAN.
Step 6 - Reset the Network
This step is very important.
After entering all three values, go to:
Connection → Networks → Reset Network
Confirm the reset by touching the checkmark when prompted.
Zebra specifically states that the network must be reset for the new network settings to take effect.
The printer's network connection will restart.
Example
Suppose your IT administrator gives you:
|
Setting |
Value |
|
IP Protocol |
PERMANENT |
|
IP Address |
192.168.1.50 |
|
Subnet |
255.255.255.0 |
|
Gateway |
192.168.1.1 |
Configure the printer as:
Connection → Wired → Wired IP Protocol → PERMANENT
Then:
Connection → Wired → Wired IP Address → 192.168.1.50
Connection → Wired → Wired Subnet → 255.255.255.0
Connection → Wired → Wired Gateway → 192.168.1.1
Then:
Connection → Networks → Reset Network → ✓
After the Reset
Once the network has restarted, verify the IP address on the printer screen.
It should show:
192.168.1.50
Then, from a Windows PC connected to the same network, open Command Prompt and run:
ping 192.168.1.50
If you receive replies, the network connection is working.
You can also open:
http://192.168.1.50
in Chrome or Edge to access the Zebra printer's web interface.
Important for your tutorial
I would include a screenshot/illustration of the ZT231/ ZT411 touchscreen showing these four settings. It will make this section much easier for readers to follow.
Menu path to highlight:
Menu → Connection → Wired → Wired IP Protocol → PERMANENT
Menu → Connection → Wired → Wired IP Address
Menu → Connection → Wired → Wired Subnet
Menu → Connection → Wired → Wired Gateway
Menu → Connection → Networks → Reset Network