Frequently Asked Questions
Find answers to common questions about our products, services, and support
While a Desktop printer is cheaper to buy today, the "hidden costs" of high-volume printing on a small machine add up quickly.
Expense Category | Desktop Printer | Industrial Printer |
Initial Purchase | Low ($300 - $600) | High ($1,200 - $3,000+) |
Media Costs | Higher (Small rolls cost more per sq. inch) | Lower (Bulk 450m-600m rolls are cheaper) |
Printhead Life | Shorter (Needs replacement more often) | Longer (Built for high heat/pressure) |
Labor Costs | High (Frequent stops to change rolls) | Low (Fewer roll changes = more uptime) |
Repair Frequency | Higher (Plastic parts wear faster) | Lower (Solid metal gear-driven systems) |
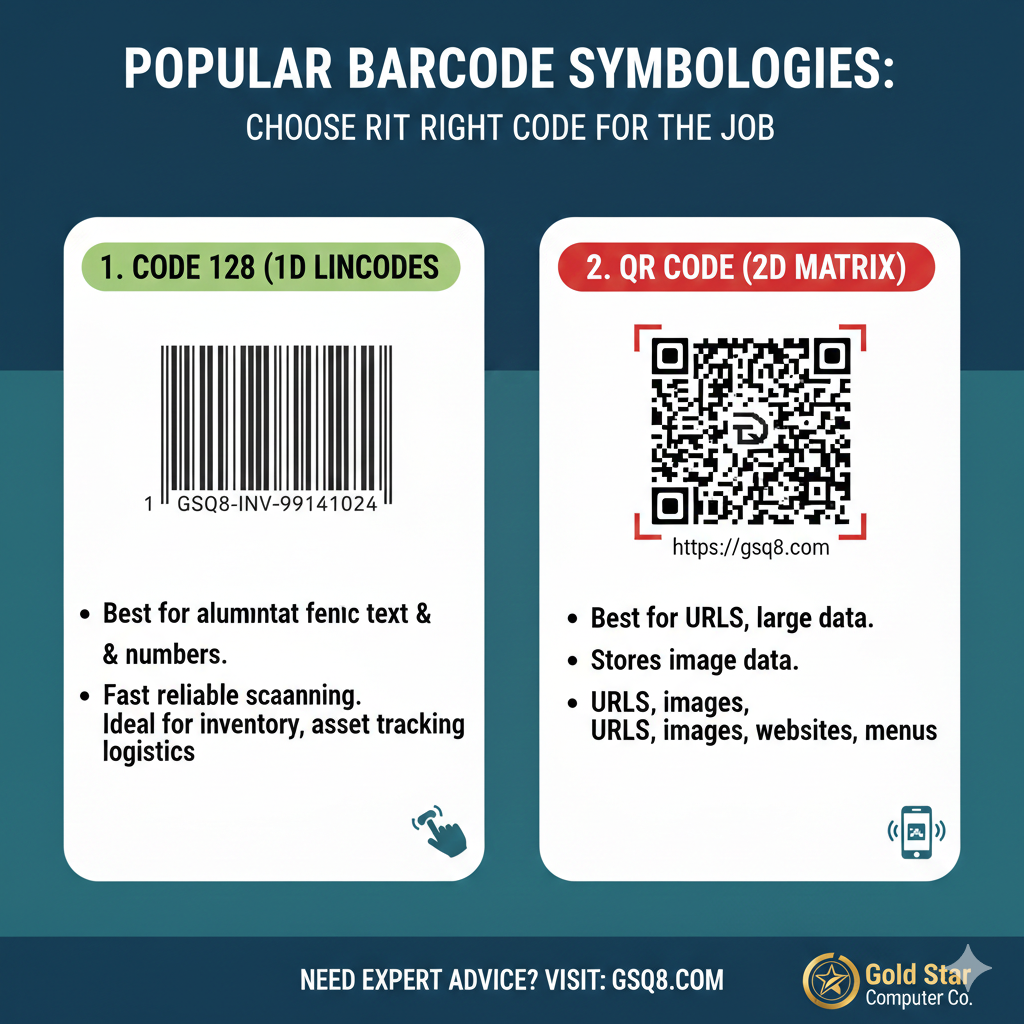
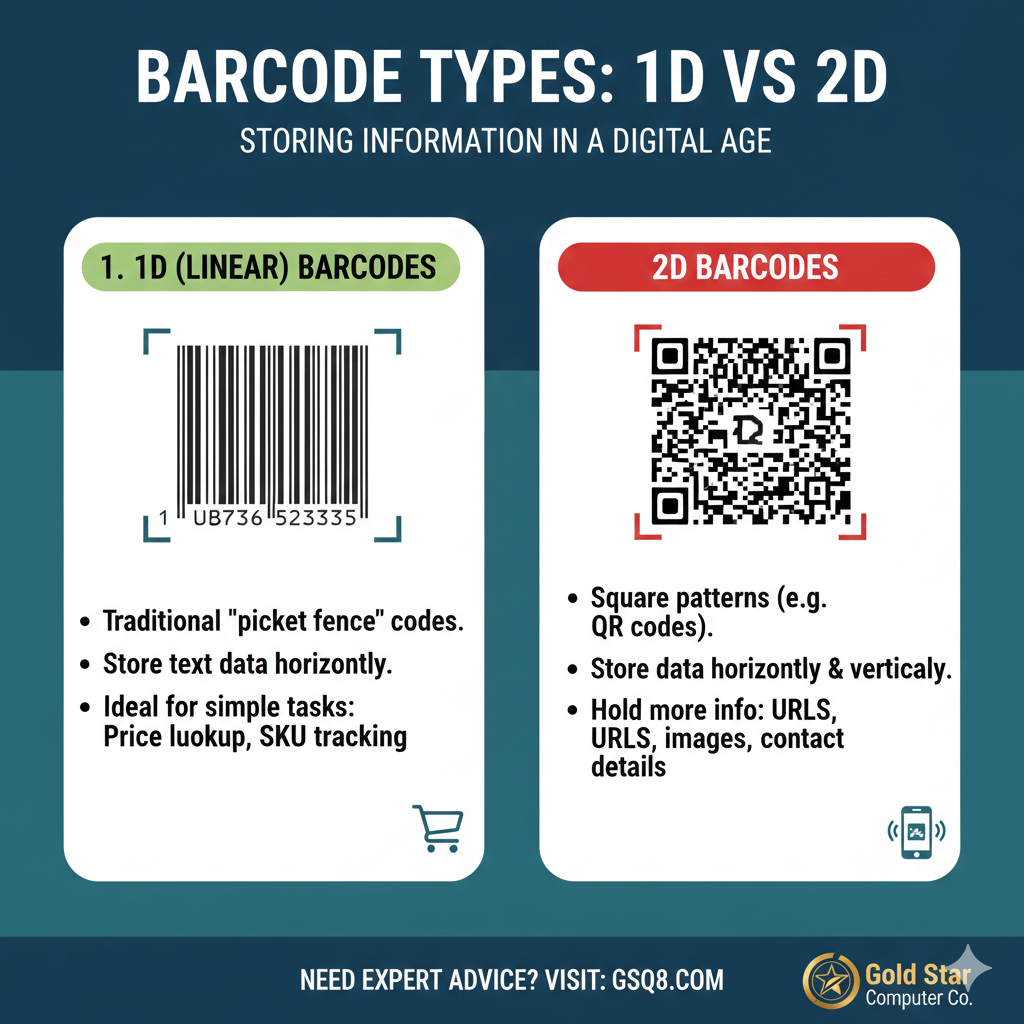
Code 128 is a high-density, linear (1D) barcode standard recognized for its exceptional accuracy and versatility. Unlike simpler barcode types, Code 128 is highly flexible and can encode a wide range of data, including:
Numeric data (0–9)
Alphanumeric data (both upper and lower-case letters)
Special characters ($ % @ # ! etc.)
Control characters
Its ability to pack a large amount of information into a compact space makes it the industry standard for logistics, shipping, and inventory management.
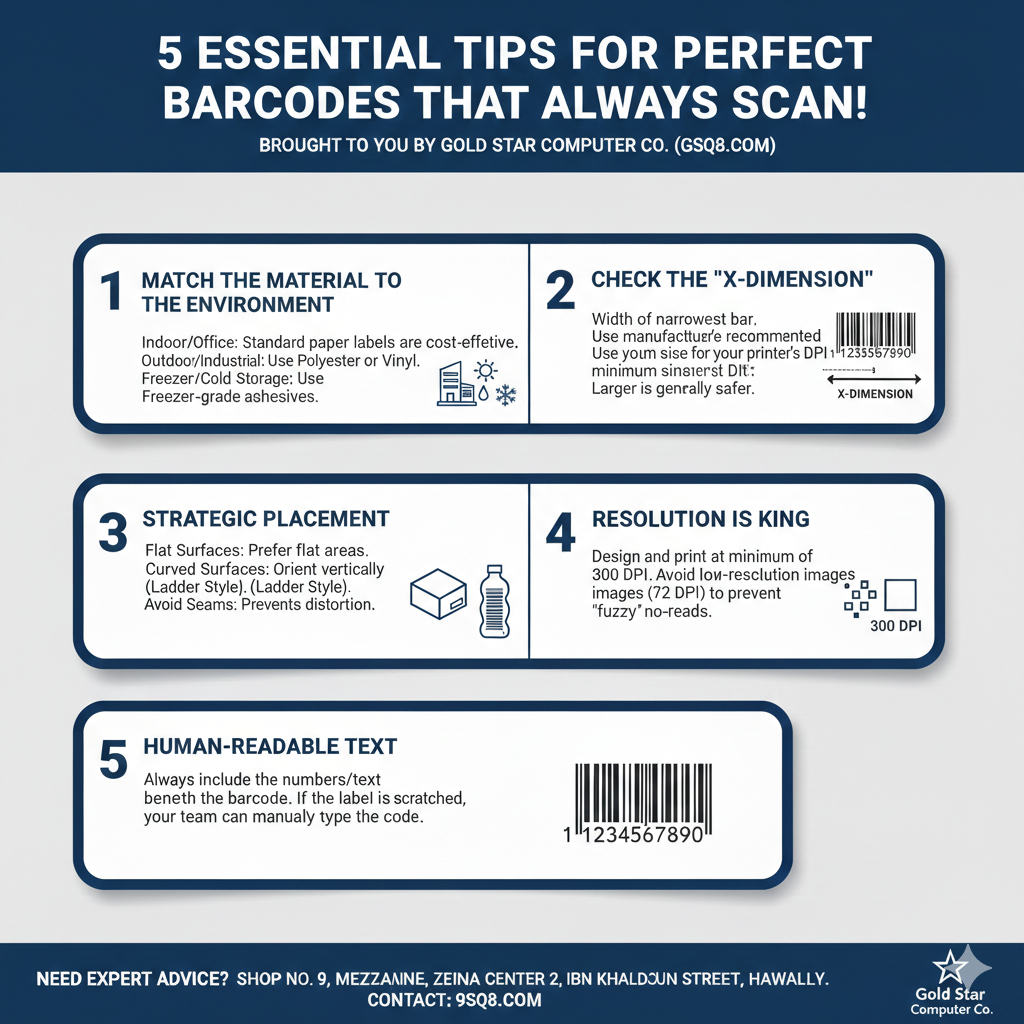
The Quiet Zone is the mandatory blank margin on both the left and right sides of a barcode.
It acts as a vital "buffer" that tells the scanner exactly where the data starts and ends. For a reliable scan, this area must be kept completely clear; if the zone is too small or has text and graphics bleeding into it, the scanner will be unable to distinguish the barcode from its surroundings, resulting in a "no-read."
** As a general rule, the quiet zone should be at least 10 times the width of the narrowest bar or a minimum of 3mm to 6mm to ensure compatibility with all scanners.
The Ultimate Barcode Quality Checklist
Brought to you by Gold Star Computer Co. (gsq8.com)
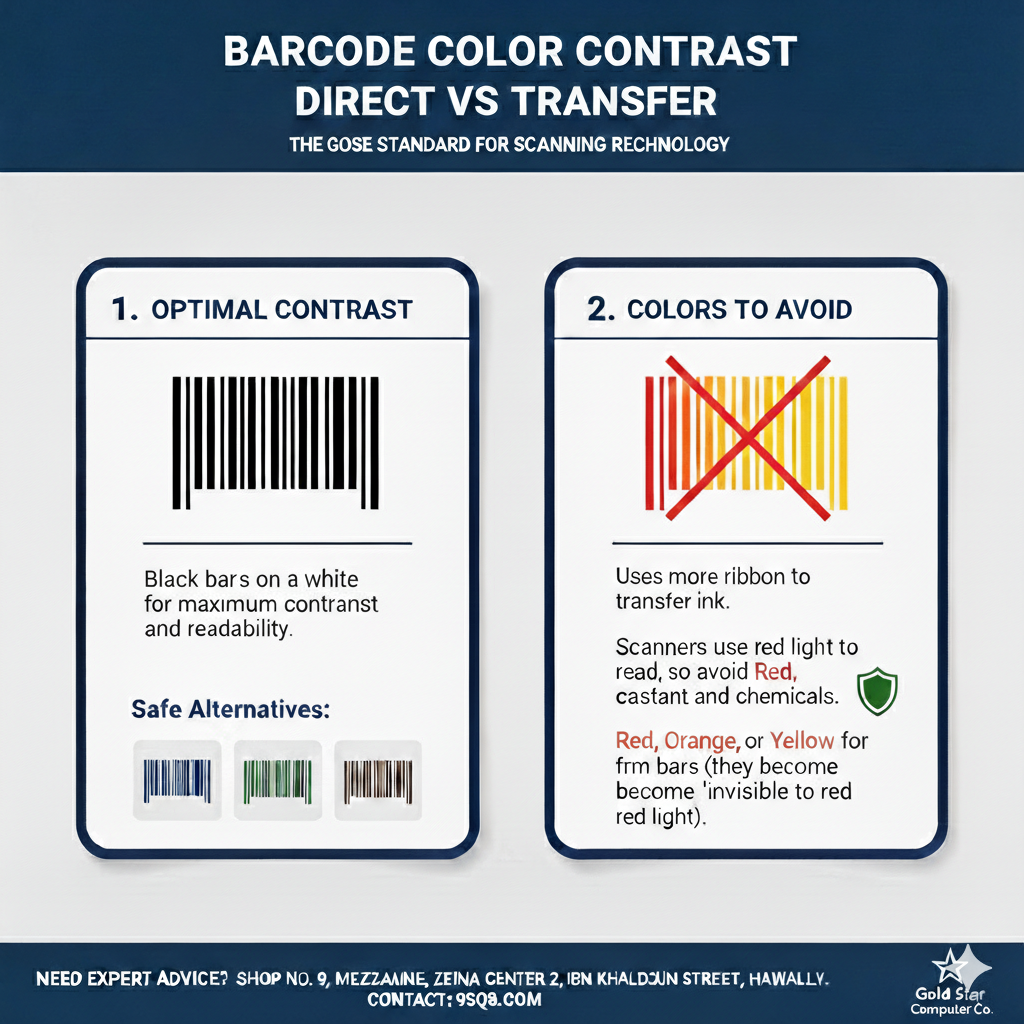
1. The Visibility Check (Contrast & Colors)
[ ] High Contrast: Ensure the barcode is black on a white or very light background.
[ ] Color Safety: Avoid using red, orange, or yellow for the bars. (Scanners use red light and cannot "see" these colors).
[ ] No "Ghosting": Confirm the print is crisp and dark with no fading, streaks, or white lines.
2. The Geometry Check (Size & Placement)
[ ] Quiet Zones: Is there at least 3mm to 6mm of clear white space on both the left and right sides of the barcode?
[ ] Flat Surface: Ensure the label is placed on a flat area. Avoid folds, seams, or sharp corners.
[ ] Orientation: For curved surfaces (like bottles), print the barcode vertically (Ladder Style) rather than horizontally (Picket Fence).
3. The Material Check (Durability)
[ ] Environment Match: For outdoor or chemical use, are you using Thermal Transfer (with a ribbon) and Synthetic/Polyester material?
[ ] Adhesive Strength: For cold storage products, ensure the label is "Freezer Grade."
[ ] Smudge Test: If you rub the label firmly and it smears, you may need a higher-grade ribbon (Wax-Resin or Resin).
4. The Data Check (Accuracy)
[ ] Human-Readable Text: Is the text/number clearly visible beneath the bars?
[ ] Correct Format: Are you using the right symbology? (e.g., Code 128 for internal assets or EAN/UPC for retail).
[ ] Resolution: Is the printer density set to at least 300 DPI for small or high-density labels?
5. The "Golden Rule" Test
[ ] Test Scan: Have you scanned the printed label with a physical scanner (not just a phone app) to ensure it pulls the correct data instantly?

To get a perfect print every time, please follow these settings in your print dialog:
Scale: Select Actual Size (or manually enter 100%).
Fit to Page: Ensure this box is Unchecked.
Paper Size: Verify it matches your label roll or sheet size exactly.
Adhesives are generally categorized into three types:
- Permanent: Best for shipping and inventory where the label must never come off.
- Removable: Ideal for retail items or glass where you want the customer to peel the label off without leaving sticky residue.
- High-Tack: Necessary for rough surfaces like wood, tires, or industrial machinery.
Code 128 is one of the most flexible barcode formats available today. It supports the entire ASCII character set, allowing you to store:
Letters: A–Z and a–z (case-sensitive)
Numbers: 0–9
Symbols: Full range of special characters
Reliability: It features a mandatory check digit to ensure 100% scanning accuracy.
| Feature | Desktop Printers (e.g., ZD220, PC42t) | Industrial Printers (e.g., ZT411, ZT610) |
Daily Volume | < 1,000 labels | 1,000 to 10,000+ labels |
Duty Cycle | Intermittent (Short bursts) | Continuous (24/7 capable) |
Construction | Plastic / Composite | Heavy-duty Metal Frame |
Ribbon Length | 74m to 300m | 450m to 600m+ |
Max Speed | 4 – 6 inches per second | 10 – 14+ inches per second |
1. Desktop Printers (The Compact Choice)
Best For: Retail shops, small offices, and healthcare clinics.
Labels Per Day: Recommended for 50–500 labels.
Pros: Small footprint, affordable price, and easy to move.
Cons: Smaller ribbon and label rolls mean you have to stop and reload more often. They can overheat if you try to print 2,000 labels in one go.
2. Industrial Printers (The Powerhouse)
Best For: Large warehouses, manufacturing, and distribution centers.
Labels Per Day: Designed for 1,000 to 5,000+ labels. High-end models (ZT600 series) can handle 10,000+ without a break.
- Pros: Large internal capacity (fewer roll changes), high-speed printing, and better internal cooling. They also support larger label rolls (up to 8-inch outer diameter).
Cons: Significant desk space required and a higher initial cost.
1. Bulk Media Discounts
Desktop printers use smaller ribbon and label rolls. When you buy in bulk for an Industrial printer (e.g., 600-meter ribbons), the cost per label is typically 20-30% lower than the smaller 74m or 300m rolls used in desktops
2. Reduced "Downtime" Labor
If an employee spends 5 minutes changing a roll:
Desktop: Change every 500 labels. (4 changes for 2,000 labels = 20 mins)
Industrial: Change every 3,000 labels. (0 changes for 2,000 labels = 0 mins)
Over a year, this saves hundreds of hours in labor costs.
3. Printhead Longevity
The printhead is the most expensive part of any printer.
Desktop: The motor has to work harder to pull media, often causing uneven wear.
Industrial: These have adjustable Printhead Pressure Toggles. You can fine-tune the pressure to use the minimum heat necessary, which can double the life of the printhead compared to a desktop model.
1. Bulk Media Discounts
- Desktop printers use smaller ribbon and label rolls. When you buy in bulk for an Industrial printer (e.g., 600-meter ribbons), the cost per label is typically 20-30% lower than the smaller 74m or 300m rolls used in desktops.
2. Reduced "Downtime" Labor
If an employee spends 5 minutes changing a roll:
Desktop: Change every 500 labels. (4 changes for 2,000 labels = 20 mins)
Industrial: Change every 3,000 labels. (0 changes for 2,000 labels = 0 mins)
Over a year, this saves hundreds of hours in labor costs.
3. Printhead Longevity
The printhead is the most expensive part of any printer.
Desktop: The motor has to work harder to pull media, often causing uneven wear.
Industrial: These have adjustable Printhead Pressure Toggles. You can fine-tune the pressure to use the minimum heat necessary, which can double the life of the printhead compared to a desktop model.
Absolutely. Brother TZe tapes are engineered to withstand extreme temperatures:
Cold Resistance: Down to $-80°\text{C}$ (Freezer safe)
- Heat Resistance: Up to $150°\text{C}$ (Microwave and industrial safe)
Most TZe tapes are designed to peel off cleanly from smooth, flat surfaces without leaving a messy residue. If a tiny amount of adhesive remains, it can usually be removed easily with a little rubbing alcohol or a mild adhesive remover
| Tape Series | Best Surface |
| Standard TZe | Flat, smooth surfaces (Files, bins, glass). |
| Strong Adhesive (TZe-S) | Textured, rough, or oily surfaces (Toolboxes, plastic bins). |
| Flexible ID (TZe-FX) | Cables, wires, and curved tubing. |
| Fabric Iron-On (TZe-FA) | Clothing, uniforms, and linens. |
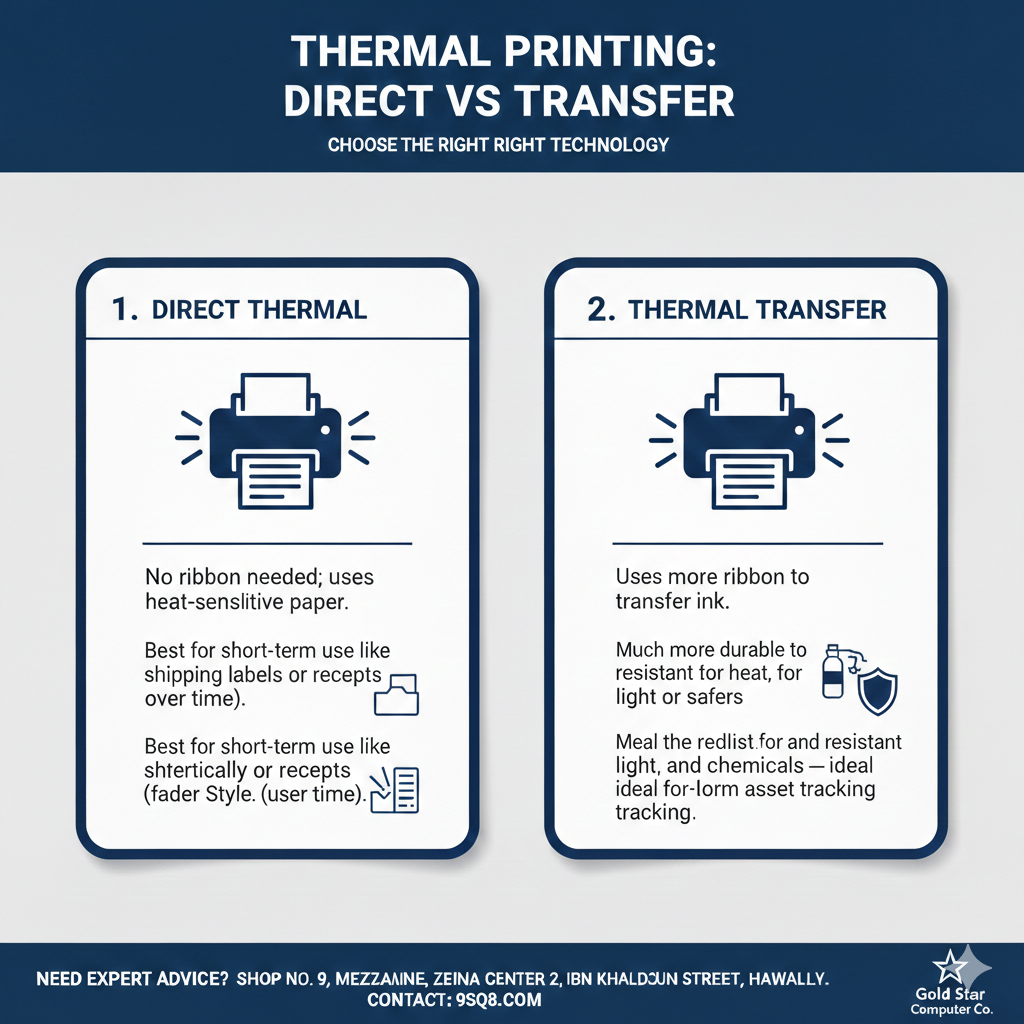
- The Process: A thermal printhead heats up in specific patterns.
- The Reaction: When the heated head touches the roll, the chemical coating turns black in those spots, forming your text or barcode.
- Durability: The print tends to fade over 6–12 months, so they aren't ideal for permanent archiving.
| Day | Morning Session | Evening Session |
| Saturday – Thursday | 9:30 AM – 1:00 PM | 5:00 PM – 8:00 PM |
| Friday | Closed | Closed |
| Day | Morning Session | Evening Session |
| Saturday – Thursday | 10:30 AM – 1:30 PM | 8:30 PM – 10:30 PM |
| Friday | Closed | Closed |
Gold Star Computer Co.
Address:
Shop No. 9, Mezzanine, Zeina Center 2, Ibn Khaldoun Street, Hawally, Kuwait.
Need Assistance?
Our team is ready to help you find the right products for your business.
Phone: [+965] 99141024
Warranty & Support Policy
At Gold Star Computer Co., we stand behind the quality of the products we provide. Please review our standard coverage terms below:
1. Standard Product Warranty
Coverage: Most hardware products include a 1-Year Manufacturer Warranty.
Scope: This covers manufacturing defects only (hardware failure under normal operating conditions).
Exclusions: This does not cover physical damage, liquid spills, power surges, or unauthorized repairs.
2. Thermal Printhead Coverage
Thermal printheads are high-precision components that experience natural wear during the printing process.
Classification: Printheads are considered consumable items.
Warranty Period: Covered by a 1-Month Warranty from the date of purchase.
Maintenance Tip: To maximize the life of your printhead, we recommend cleaning it with an alcohol swab every time you replace the ribbon or label roll.
How to Claim Warranty Support
If you encounter a technical issue with your equipment, please follow these steps:
Verification: Ensure you have your original purchase invoice.
Initial Support: Contact our technical team at 99141024 for remote troubleshooting. Many issues can be resolved via a quick calibration or settings adjustment.
Service Center: If the issue persists, visit our showroom in Hawally (Shop No 9, Mezzanine, Zeina Center 2, Ibn Khaldun Street) for a formal inspection.
Our Technical Commitment
Remember, we provide free technical support for the installation and configuration of all products purchased from us. Our goal is to ensure your business remains operational without interruptions.
Step-by-Step Printer Calibration
1. Position the Media Sensor
The media sensor (often a small slider with a green LED or a triangle icon) tells the printer where a label starts and ends.
The Rule: The sensor must be positioned directly under the label material, not the gap or the edge of the liner.
Special Labels: If you are using labels with a "Black Mark" on the back, ensure the sensor is aligned to pass directly over that mark.
2. Run the Calibration
Once the sensor is in place, you must "teach" the printer the length of your labels.
Action: Go to the printer’s control panel or the driver settings on your PC and select "Calibrate."
What happens: The printer will feed 2–3 labels to measure the distance between the gaps. Once it stops exactly at the tear-off bar, the calibration is successful.
When to do this: Every time you switch to a different label size.
Quick Fix Tip
Sensor Placement: Ensure the transmissive sensor (slider with the light icon) is positioned under the label gap, not the solid backing.
Adhesive Cleanup: Wipe the sensors with an alcohol swab before calibrating. Even a tiny bit of glue can cause a "Media Out" error.
Media Mode: Double-check that your driver is set to Gap/Notch for standard labels or Black Mark for tags with a black line on the back.
- If the printer continues to feed blank labels after calibration, double-check that the green latches are fully locked. If the printhead is slightly open, the sensor cannot read the labels correctly.
Maintaining your printer is key to getting crisp, readable labels. To ensure the best performance from your thermal printer, follow these two maintenance steps:
1. Clean the Thermal Printhead
Over time, dust, adhesive residue, and carbon from the ribbon can build up on the printhead, causing white streaks or faded print.
Action: Turn off the printer and open the cover. Use an isopropyl alcohol swab (90% or higher is best) to gently wipe the thin, dark line on the printhead.
Frequency: It is best practice to clean the printhead every time you change a roll of labels or a ribbon.
2. Check the Green Latches
If your labels are printing lighter on one side or looking "fuzzy," the printhead may not be making even contact with the label.
Action: Ensure that the green/orange locking latches on both sides of the print mechanism are pressed down firmly until they "click."
Why it matters: Even a tiny gap in the latch can cause a loss of pressure, leading to "no-reads" or skipped labels.
| Problem | Possible Cause | Solution |
| Faded or Light Print | Low heat settings or dirty printhead. | Increase "Darkness" in settings or clean the printhead with alcohol. |
| White Streaks / Lines | Build-up on printhead or damaged element. | Clean the printhead thoroughly. If lines persist, the printhead may need replacement. |
| Labels Skipping | Sensor misalignment or incorrect label size settings. | Calibrate the printer and ensure the sensor is positioned over the label gap/black mark. |
| "No Ribbon" Error | Ribbon is loaded upside down or not seated correctly. | Perform the "Tape Test" (tape should pull ink from the dull side). Re-seat the green latches. |
| Smudging | Incorrect ribbon type for the label material. | Ensure you are using Resin for synthetic labels or Wax for plain paper. |
Maintenance Checklist
[ ] Cleanliness: Wipe the printhead with an alcohol swab every week or month.
[ ] The "Click" Test: Always verify both green/orange latches are clicked shut to ensure even pressure.
[ ] Environment: Keep the printer in a dust-free area; dust is the #1 cause of premature printhead failure.
Ensure Perfect Alignment & Stop Skipping Labels
If your printer is feeding blank labels or showing a "Media Out" error, it likely needs to be calibrated. Follow these three steps to reset the sensors.
Step 1: Sensor Alignment
The media sensor (usually a movable green slider) must be able to "see" the label.
Transmissive/Gap Sensing: Slide the sensor so it is positioned under the center of the label. Avoid the very edge of the liner.
Black Mark Sensing: If your labels have a black line on the back, align the sensor directly over the path of that mark.
Step 2: The Physical Check
Before starting the digital calibration, ensure the hardware is locked:
Media Guides: Snug the green media guides against the sides of the label roll so it doesn't "walk" or shift.
Pressure Latches: Close the printhead and press down on both green latches until you hear a firm click.
Step 3: Running Calibration
Depending on your model, use one of the following methods:
Method A: The Button Shortcut (Fastest)
With the printer ON and ready, press and hold the FEED button.
Wait for the status light to flash (usually 2 or 3 times, depending on the brand).
Release the button. The printer will feed 2–4 labels and stop exactly at the gap.
Method B: Using the Driver (Windows)
Go to Control Panel > Devices and Printers.
Right-click your printer and select Printing Preferences.
Look for the Tools or Stock tab.
Click Calibrate or Learn Label Length.
Troubleshooting "Calibration Failed"
Dirty Sensor: Dust can "blind" the sensor. Blow it out with a can of compressed air.
Wrong Sensor Type: Ensure your driver is set to "Gap/Notch" for standard labels or "Mark" for black-backed labels.
Ribbon Interference: Ensure the ribbon is not sagging and blocking the sensor path.
| Issue | Solution |
| Labels too small/large | Set Scale to 100% or Actual Size. |
| Barcodes not scanning | Disable 'Fit to Page' to prevent distortion. |
| Alignment is off | Check that your Media Type matches your printer settings. |
A flashing red light usually indicates that the printer has paused because it cannot detect the labels or the ribbon correctly. Follow these steps to resolve the issue:
Check the Media (Labels): Ensure the label roll is loaded correctly and the "Gap Sensor" (the small plastic slide) is positioned directly under the labels. If the sensor can’t "see" the gap between labels, it will error out.
Calibrate the Printer: This is the most common fix. Hold down the Feed button until the light flashes a specific number of times (usually 2 or 3 times, depending on the model) to help the printer "learn" the label size.
Check the Ribbon: If you are using Thermal Transfer mode, ensure the ribbon is not wrinkled, snapped, or finished. If you are using Direct Thermal (no ribbon), make sure the printer settings are not accidentally set to "Thermal Transfer."
Head Open: Ensure the print head is clicked firmly into place on both sides. Even a slight gap will trigger an error light.
Clean the Sensor: Dust or adhesive residue can block the sensors. Use a can of compressed air or a lint-free cloth to gently clean the interior.
Printer Calibration Quick Reference
Use the table below to find the specific calibration steps for your hardware. Note: Always ensure labels are loaded correctly before starting.
| Brand / Series | Specific Models | Calibration Method |
| Zebra Desktop | GC420t, ZD-Series, GK/GX | 3-Flash Method: Hold FEED until the light flashes 1x, 2x, then 3x. Release immediately. |
| Zebra Industrial | ZT231, ZT411, ZT611 | Touchscreen: Menu > Print > Sensors > Manual Calibration. Follow on-screen prompts. |
| Zebra Industrial | ZT230, ZT410, ZT610 | Buttons: Hold PAUSE + CANCEL for 2 seconds OR use LCD Menu: Media/Ribbon Cal. |
Honeywell | PC42t, PC43 | Smart Cal: Turn OFF. Hold FEED while turning ON. Release when light flashes. |
Soonmark | M8, SM-420 | Beep Method: Turn OFF. Hold FEED. Turn ON. Release after the second beep. |
SATO | WS4 Series | Power-On Cal: Turn OFF. Hold FEED. Turn ON. Release when light is Orange/Red. |
If calibration doesn't clear the error light, check these three things:
Ribbon Tension: Ensure the ribbon is tight and not wrinkled.
Printhead Latch: Make sure the head is clicked down firmly on both sides.
Label Width: Ensure the guide "wings" are snug against the label roll so it doesn't wobble.
Printer Error Code Decoder
| Brand | Indicator | Meaning | Required Action |
Zebra | Solid Red | Media Out / Head Open | Reload labels/ribbon or snap the lid shut. |
Zebra | Flashing Red | Calibration Error | Perform the 3-Flash or Manual Cal. |
Honeywell | Blinking Red | Ribbon Error | Ensure ribbon is loaded and not snapped. |
Honeywell | Solid Red | System Fault | Restart printer; check for label jam. |
Soonmark | 3 Beeps | Paper Error | Adjust sensor; check if label roll is empty. |
Soonmark | Continuous Beep | Overheat | Turn off for 5 mins to let printhead cool. |
SATO | Red Light | Sensor Error | Clean the sensor and re-calibrate. |
SATO | Orange Light | Head Open | Ensure the printhead lever is fully locked. |
If the table above doesn't clear the error, try these "Quick Three" steps:
The "Gap" Check: Ensure the labels are passing through the sensor, not over it.
The "Ribbon" Check: If you aren't using a ribbon, ensure your printer driver is set to Direct Thermal. If it's set to "Thermal Transfer," it will look for a ribbon and show an error.
The "Sticky" Check: Use an alcohol swab to clean the Black Mark or Gap Sensor.
Yes, RFID labels require a special Zebra (or compatible) RFID printer. A normal printer will NOT work.
Why normal printers won’t work
RFID labels are not just printed—they also need to be encoded with data inside the RFID chip.
A regular printer can:
-
Print text/barcode on the label ✅
-
Cannot write data to the RFID chip ❌
What you need
You need an RFID-enabled printer/encoder, such as:
-
Zebra ZD500R
-
Zebra ZT410 RFID
-
Zebra ZT411 RFID
These printers:
-
Print label content (text, barcode)
-
Encode RFID chip (EPC, serial, etc.)
-
Verify encoding (to avoid bad tags)
If you already have a normal printer
You have 2 options:
-
Use pre-encoded RFID labels
-
Buy labels already programmed
-
Your normal printer can print only the visible part
-
-
Use a separate RFID encoder device
-
Print label → encode using external reader/writer
-
Slower and more complex setup
-
Recommendation
If you're handling bulk (like your 50,000 applications case) → go for an RFID printer like Zebra ZT411.
If it's small scale → pre-encoded labels might be cheaper.
Software & Driver Support
To ensure your barcode printer operates at peak performance, it is essential to use the latest official drivers. These drivers provide the necessary communication between your design software (like Bartender or ZebraDesigner) and the printer hardware.
How to Get Started:
Identify Your Model: Check the sticker on the back or bottom of your printer for the specific model name.
Download Official Drivers: Visit the manufacturer’s official website (e.g., Zebra, Honeywell, TSC, or Godex) and navigate to the "Support & Downloads" section.
Install & Configure: Run the installer before connecting the USB cable to ensure Windows recognizes the device correctly.
1. Wax Ribbons (Standard)
Best For: Standard paper labels, shipping labels, and short-term retail tags.
Characteristics: The most economical choice; requires a lower heat setting which helps extend your printer’s printhead life.
Important Note: Wax is not durable against friction. If labels are rubbed frequently or exposed to moisture, they will smudge. Use these for high-volume, low-cost applications.
2. Premium Wax Ribbons
Best For: High-quality paper labels and some coated paper stocks.
Characteristics: Contains a small percentage of resin to make the print darker and slightly more smudge-resistant than standard wax.
Important Note: Ideal for labels that need a "crisp" professional look for branding, such as shelf-edge labels or high-end retail packaging.
3. Wax-Resin Ribbons
Best For: Coated paper labels, synthetic materials (like Polypropylene), and glossy stocks.
Characteristics: A 50/50 blend that provides excellent resistance to smudging, moisture, and mild chemicals.
Important Note: This is the "All-Rounder." If a customer is unsure of their needs, Wax-Resin is the safest bet for medium-term durability. Perfect for warehouse labels handled frequently.
4. Resin Ribbons (Full Resin)
Best For: Synthetic labels (Polyester, Polyimide, Vinyl) and plastic tags.
Characteristics: Extremely durable. The ink "bonds" to the plastic surface and is virtually impossible to rub off.
Important Note: Requires a higher heat setting on the printer. This is the go-to for chemical drum labeling, medical equipment, and electronics.
5. Premium Resin Ribbons
Best For: Extreme environments, outdoor use, and harsh industrial chemicals.
Characteristics: The highest level of resistance. Withstands extreme heat (up to 300°C), steam, gasoline, and industrial solvents like alcohol or acetone.
Important Note: Use only with high-end Polyester or Kapton labels. Using premium resin on cheap paper is a waste of money—the paper will fail long before the ink does!
Selecting the correct ribbon is essential for maintaining scannable, long-lasting barcodes in Kuwait’s demanding climate. At Gold Star Computer Co., we specialize in matching the right thermal transfer ribbon to your specific label material.
🎗️ Thermal Ribbon Comparison
Wax (Standard)
Recommended Label Material: Plain or uncoated paper.
Durability Level: Low (May smudge if handled frequently).
Best Use Case: General shipping labels, box labeling, and short-term retail tags.
Premium Wax
Recommended Label Material: Plain paper and some coated stocks.
Durability Level: Medium (Offers slight smudge resistance).
Best Use Case: Professional branding, shelf-edge labels, and inventory tagging.
Wax-Resin
Recommended Label Material: Coated paper, glossy paper, or Polypropylene (BOPP).
Durability Level: Medium-High (Smear-proof and moisture resistant).
Best Use Case: Warehouse inventory, logistics labels, and items handled frequently.
💡 Pro-Tips for gsq8.com Customers
Ribbon Width: Always select a ribbon that is 5mm to 10mm wider than your label roll. This ensures the ribbon acts as a buffer, preventing the label edge from scratching the expensive printhead.
The "Tape Test": Not sure which side is the ink? Press a piece of adhesive tape to the ribbon. If the black ink pulls off onto the tape, that is the side that must face the labels.
Heat Management: If you are using Wax-Resin, you may need to slightly increase the "Darkness" setting in your printer driver compared to standard Wax to ensure a crisp, dark transfer.
Ribbon Selection Guide
Wax Ribbons
Best For: General purpose applications.
Durability: Low (may smudge if handled frequently).
Recommended Labels: Standard paper, shipping labels, and cardboard tags.
Wax-Resin Ribbons
Best For: High-quality, long-lasting prints.
Durability: Medium (smudge and scratch resistant).
Recommended Labels: Semi-gloss paper, coated paper, and specialized shipping tags.
Full Resin Ribbons
Best For: Extreme conditions and industrial use.
Durability: High (resistant to chemicals, water, and intense heat).
Recommended Labels: Synthetic, Polyester, PVC, and Vinyl.
Which Ribbon is Right for You?
1. Wax Ribbons (Economy)
Best Use: Shipping, retail, and short-term indoor storage.
Why choose it: It is the most cost-effective option. It prints at high speeds with lower heat settings.
Limitation: The ink can smudge or scratch if handled frequently.
2. Wax-Resin Ribbons (Performance)
Best Use: Warehouse labels, healthcare, and refrigerated items.
Why choose it: The addition of resin makes the print resistant to moisture, chemicals, and abrasion.
Recommended for: Semi-gloss or glossy paper labels.
3. Full Resin Ribbons (Industrial)
Best Use: Asset tagging, chemical drums, and outdoor equipment.
Why choose it: This is the most durable ribbon available. It is designed to survive Kuwait’s heat, direct sunlight, and even harsh industrial solvents.
Recommended for: Synthetic materials like Polyester or Polypropylene.
Quick Technical Tips
Ribbon Width: Always choose a ribbon that is slightly wider than your label roll. This protects the printhead from wearing down against the edges of the labels.
Ink Side: Ensure you know if your printer requires CSI (Ink Side In) or CSO (Ink Side Out). Zebra usually uses CSO, while some SATO or Honeywell models may vary.
Heat Settings: If your print is too light, increase the "Darkness" setting in your driver. If the ribbon is snapping or sticking, your heat setting is too high.
The Width Rule: Always use a ribbon that is slightly wider than your label roll. This prevents the edges of the labels from rubbing against and damaging the printhead.
Storage: In Kuwait, keep your ribbons in a cool, dry place. Excessive heat before use can cause the ink layers to stick together.
Darkness Settings: If your print is too light, increase the "Darkness" or "Heat" setting in your printer driver rather than slowing down the print speed.
Still Have Questions?
Our team is ready to help you with any questions